Delphi Developers' Handbook
Chapter 15: Other Delphi Extensions
Copyright Marco Cantu' 1997"Hacking" the Delphi Environment
All the techniques we’ve described so far in this part of the book, with very few exceptions, are "official" ways of customizing the Delphi development environment (even though some of them aren’t properly documented). In this last section of the chapter, we’ll explore a few totally unofficial techniques. To figure out how these techniques works, we had to do some hacking.
Here’s the basic idea: when you write a property editor, component editor, or DCU-based wizard (but not a DLL-based wizard or a VCS DLL), you’re actually adding classes and code to the Delphi environment itself. Since the Delphi environment is a Delphi application, you can apply all the Delphi programming techniques we’ve discussed to the environment itself. For example, consider what happens if you write the following within one of these extensions to the Delphi environment:
Application.Title := 'New Delphi';
The title of the Delphi main window and of the TaskBar icon will display the new string. You’ve basically changed the title of Delphi itself, and many message boxes displayed by the system will use this new title. However, this shouldn’t surprise you, since Borland used Delphi to build Delphi itself.
In this section, we’ll use similar techniques to build some useful tools. We’ll first build a tool to explore the structure of Delphi’s forms and components; then we’ll create a Delphi customization tool that will allow a user to turn the Component Palette into a multiline TabControl, to change the font of the Object Inspector, and to add new menu items to some windows. At the end we’ll use a similar technique to call the internal event handlers for Delphi menu items directly and even change them!
Delphi Exposed
Before we start examining the details of modifying the Delphi environment, we must know some of the implementation details, such as the names of the components and forms Borland uses. Fortunately, getting this information is quite simple: our Delphi Exposed Wizard creates a text file that outlines the relationships between the components Delphi uses internally. Of course, we can list only the components in use at a given moment, since some of the additional Delphi forms aren’t always open.
The Delphi Exposed Wizard is part of a separate package (not the package for this chapter) stored in the DelphExp directory. The package includes this standard wizard, which defines a simple Execute method showing a separate form:
procedure TDelphiExposedWizard.Execute;
begin
  Application.Title := ''Delphi 3 (Exposed)';
  DelExForm := TDelExForm.Create (Application);
  try
    DelExForm.ShowModal;
  finally
    DelExForm.Free;
  end;
end;
You’ll notice that, as a side effect, the wizard changes Delphi’s own title! The secondary form, displayed by the wizard, contains a TreeView component and four buttons that do the following:
- Show the components hierarchy in two different ways
- Save the contents of the tree view to a text file
- Close the form.
The first two buttons fill the tree view with the structure of the Delphi environment, arranging components in either parent/child or owner/owned order. In the first case, the wizard starts by adding the forms stored in the Screen object:
procedure TDelExForm.BtnParentClick(Sender: TObject);
var
 I: Integer;
 Node: TTreeNode;
begin
  TreeView.Items.BeginUpdate;
  Screen.Cursor := crHourGlass;
  try
    TreeView.Items.Clear;
    for I := 0 to Screen.FormCount - 1 do
    begin
      Node:= TreeView.Items.AddChild (nil,
        Format ('%s (%s)', [
          Screen.Forms[I].Name,
          Screen.Forms[I].ClassName]));
      AddChild (Node, Screen.Forms[I]);
    end;
  finally
    TreeView.Items.EndUpdate;
    Screen.Cursor := crDefault;
  end;
end;
You can see that for every form, the wizard calls the AddChild method, a custom method we’ve added to the form. This method simply lists all the controls of the current form, and then recursively lists the controls for every TWinControl descendant:
procedure TDelExForm.AddChild (
  Node: TTreeNode; Control: TWinControl);
var
  I: Integer;
  ChildNode: TTreeNode;
begin
  for I := 0 to Control.ControlCount - 1 do
  begin
    ChildNode := TreeView.Items.AddChild (Node,
      Format ('%s (%s)', [
        Control.Controls[I].Name,
        Control.Controls[I].ClassName]));
    if Control.Controls[I] is TWinControl then
      AddChild (ChildNode, TWinControl (
        Control.Controls[I]));
  end;
end;
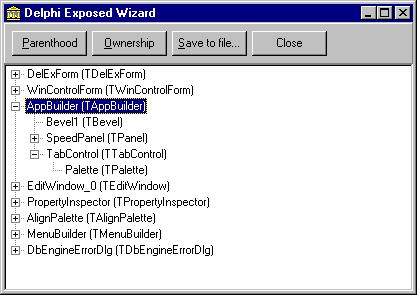
Figure 15.12 shows the output of this wizard with the list of the Delphi main windows (for a given situation). You’ll notice that this list doesn’t display the names of the nonvisual components. By the way, in the directory of this project you’ll find the file Parent.txt, which we generated by saving this parent hierarchy to a text file (using the third button).
Figure 15.12: The list of Delphi’s own forms, along with all the controls they contain, produced by the Delphi Exposed Wizard.

In contrast, when you click the Ownership button, the wizard begins with the Application object and navigates the object hierarchy scanning each component’s Components array, again using a recursive method:
procedure TDelExForm.BtnOwnerClick(Sender: TObject);
begin
  TreeView.Items.BeginUpdate;
  Screen.Cursor := crHourGlass;
  try
    TreeView.Items.Clear;
    AddOwned (nil, Application);
  finally
    TreeView.Items.EndUpdate;
    Screen.Cursor := crDefault;
  end;
end;

procedure TDelExForm.AddOwned (
  Node: TTreeNode; Component: TComponent);
var
  I: Integer;
  ChildNode: TTreeNode;
begin
  for I := 0 to Component.ComponentCount - 1 do
  begin
    ChildNode := TreeView.Items.AddChild (Node,
      Format ('%s (%s)', [
        Component.Components[I].Name,
        Component.Components[I].ClassName]));
    AddOwned (ChildNode, Component.Components[I]);
  end;
end;
The result of this operation is a much bigger tree, which includes (among other things), all of the Delphi main menu items. It also includes many strange and unnamed objects, used internally by Delphi but not visible in the development environment.
Using this information, we can hook into the system again, change it, and thereby make it more flexible and configurable.
Customizing the Delphi Environment
What we really want to do is create a single wizard that we can use to customize the Delphi environment in many different ways. We haven’t tried to add all the interesting customizations to this wizard, but once you understand the foundations, you’ll be able to extend it as you see fit.
My Custom Delphi Wizard is another simple wizard; you’ll find it in the Comps directory and as part of the Chapter 15 package. When you activate this wizard, it simply creates and displays a form, based on a PageControl component:
procedure TMyDelphiWizard.Execute;
begin
  MyDelphiForm := TMyDelphiForm.Create (Application);
  try
    MyDelphiForm.ShowModal;
  finally
    MyDelphiForm.Free;
  end;
end;
The various pages of this form allow the user to customize different areas of the Delphi environment.
The Font of the Object Inspector
If you’ve ever attended a conference presentation on Delphi programming, you’ll know that the presenter can easily set the code editor font so that everyone, including people sitting far in the back, can read it. Unfortunately, there’s no corresponding way to change the Object Inspector font, and people in the back of the room won’t be able to see the names and the values of the properties you’re setting.
Solving this problem is actually quite simple, because the Object Inspector form adapts itself very well to larger fonts. As a result, just a few lines of code will do the trick. By the way, the form defines a variable that refers to the Object Inspector form:
  private
    Inspector: TForm;
We initialize this in the OnCreate event handler of the form:
procedure TMyDelphiForm.FormCreate(Sender: TObject);
var
  I: Integer;
begin
  Inspector := nil;
  for I := 0 to Screen.FormCount - 1 do
    if Screen.Forms[I].ClassName = 'TPropertyInspector' then
      Inspector := Screen.Forms[I];
  if not Assigned (Inspector) then
    raise Exception.Create ('Object Inspector not found');
end;
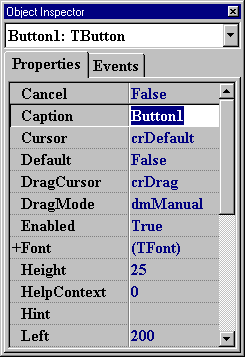
Now when the user presses the Font button of the Inspector page, the wizard simply changes the font (which you can see in Figure 15.13):
procedure TMyDelphiForm.BtnInspectorFontClick(Sender: TObject);
begin
  FontDialog1.Font := Inspector.Font;
  if FontDialog1.Execute then
    Inspector.Font := FontDialog1.Font;
end;
Figure 15.13: The My Delphi Wizard can allows you to change the font of the Object Inspector.

The Multiline Palette
An even more interesting trick is to toggle the value of the Multiline property of the TabControl component, which hosts Delphi’s Component palette: private
Palette: TTabControl;
procedure TMyDelphiForm.FormCreate(Sender: TObject);
begin
Palette := Application.MainForm.
FindComponent ('TabControl') as TTabControl;
Once we’ve retrieved a reference to the TabControl component, using the two lines of code we’ve just shown, we can add a check box to the wizard to perform this operation. The code is quite simple:
procedure TMyDelphiForm.CheckMultilineClick(Sender: TObject);
begin
  Palette.Multiline := CheckMultiline.Checked;
end;
The only problem with this code is that part of the palette will be hidden from view when it changes from single-line to multiline mode. The correct size for the palette depends on the number of lines it displays, the width of your screen, and the font the palette uses. It’s possible to write code for all this, but we decided to keep the example simple, and let the user resize the Component palette using an UpDown component connected to a read-only edit box:
procedure TMyDelphiForm.UdHeightClick(Sender: TObject; Button: TUDBtnType);
begin
  Palette.Height := UdHeight.Position;
  // force resize
  SendMessage (Application.MainForm.Handle,
    wm_Size, 0, 0);
end;
Simply setting the height of the Component palette isn’t enough, though. The Delphi main Window has a fixed size, automatically computed based on the size of the components it hosts. For this reason, after we change the height of the palette, we just ask Delphi’s main window (Application.MainForm) to resize itself. Delphi will ignore the size we ask for and simply reapply its own sizing rules. This does the trick.
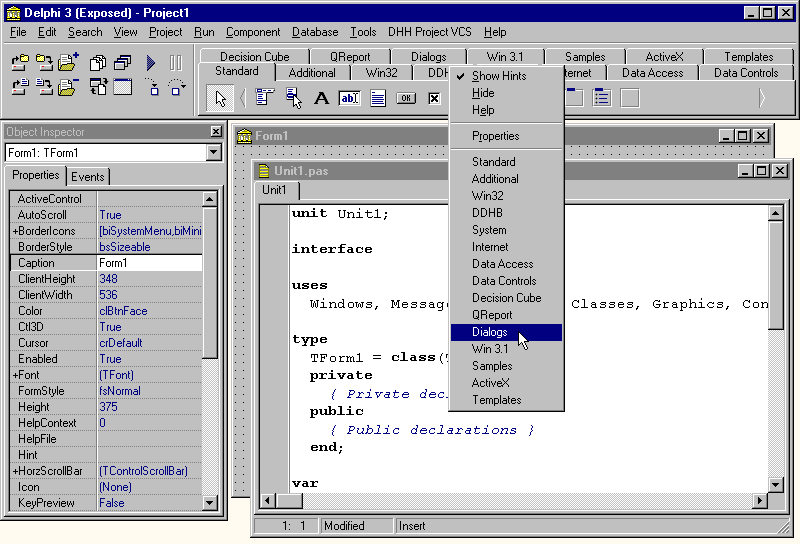
In Figure 15.14 you can see the multiline Component palette in Delphi, displayed at the proper size, and the wizard page that relates to its settings. There’s also a Font button for the palette, but this doesn’t work very well with bigger fonts. Finally, there’s another button that refreshes the new Component palette popup menu.
Figure 15.14: Delphi’s Component palette is now multiline! This is very handy when you have more palette pages than your screen can host.

Adding New Menu Items
The last addition we’ll perform with this wizard is to change the Component palette’s popup menu. Our wizard adds new items to this menu to let the user select a page of the palette. The code, executed when the wizard starts and when the user presses the Refresh button, simply removes any extra menu items we may have added before, and then adds a new menu item for each tab of the Palette TabControl component:
procedure TMyDelphiForm.BtnRefreshMenuClick(Sender: TObject);
var
  i: Integer;
  mi: TMenuItem;
begin
  // remove extra items
  with Palette.PopupMenu do
    if Items.Count > 5 then
      for i := Items.Count - 1 downto 5 do
        Items[i].Free;
  // add separator
  mi := TMenuItem.Create (Application);
  mi.Caption := '-';
  Palette.PopupMenu.Items.Add (mi);
  // add one item for every tab
  for i := 0 to Palette.Tabs.Count - 1 do
  begin
    mi := TMenuItem.Create (Application);
    mi.Caption := Palette.Tabs [i];
    mi.OnClick := ChangeTab;
    Palette.PopupMenu.Items.Add (mi);
  end;
end;
Once you’ve executed this code, the local menu of the palette will resemble Figure 15.15. You’ll notice that for every menu item we create, we associate a common OnClick event handler. The event handler code changes the current tab to the page having the same text as the selected menu item (the Sender):
procedure TMyDelphiForm.ChangeTab (Sender: TObject);
begin
  Palette.TabIndex := Palette.Tabs.IndexOf (
    (Sender as TMenuItem).Caption);
  Palette.OnChange (self);
end;
Figure 15.15: The extended popup menu of the Component palette allows a user to move to a new page faster.

After we’ve set the index of the new page, the wizard must explicitly call the OnChange event handler (which doesn’t execute automatically) to force Delphi to update the current palette page properly.
Storing Default Values
The final improvement we want to make is that we’d like to set the multiline flag and the palette height once, and then let the wizard restore the values when we run Delphi in the future. In other words, we want to make these settings persistent. The best solution is to store the new values in the Windows Registry, using the standard Delphi entry. Here’s the updated version of the wizard’s Execute method, showing the code we’ll use to set the Registry values as you exit from the form:
procedure TMyDelphiWizard.Execute;
var
  Reg: TRegistry;
  Palette: TTabControl;
begin
  MyDelphiForm := TMyDelphiForm.Create (Application);
  try
    MyDelphiForm.ShowModal;
  finally
    MyDelphiForm.Free;
  end;
  // saves the status in the registry
  Reg := TRegistry.Create;
  Reg.OpenKey (ToolServices.GetBaseRegistryKey +
    '\MyDelphiWizard', True);
  Palette := Application.MainForm.
    FindComponent ('TabControl') as TTabControl;
  Reg.WriteBool ('Multiline', Palette.Multiline);
  Reg.WriteInteger ('PaletteHeight', Palette.Height);
  Reg.Free;
end;
As we mentioned above, this method uses Delphi’s own Registry key (retrieved by calling the ToolServices global object’s GetBaseRegistryKey method), and then either creates or updates a custom key for the wizard, based on the Boolean OpenKey parameter. The values we add or update relate only to the multiline style and the height of the Component palette, but you can easily modify the method to store other options for the fonts and other settings.
If it makes sense to update these values after invoking the wizard, then it also makes sense to update the current setting without any user intervention. The only method in the wizard’s unit called when Delphi loads the unit is the Register procedure. For this reason, we’ve updated this procedure as follows:
procedure Register;
var
  Palette: TTabControl;
  Reg: TRegistry;
begin
  RegisterLibraryExpert(TMyDelphiWizard.Create);
  // load the status from the registry
  Reg := TRegistry.Create;
  Reg.OpenKey (ToolServices.GetBaseRegistryKey +
    '\MyDelphiWizard', True);
  Palette := Application.MainForm.
    FindComponent ('TabControl') as TTabControl;
  if Reg.ValueExists ('Multiline') then
    Palette.Multiline := Reg.ReadBool ('Multiline');
  if Reg.ValueExists ('PaletteHeight') then
    Palette.Height := Reg.ReadInteger ('PaletteHeight');
  // force resize
  SendMessage (Application.MainForm.Handle,
    wm_Size, 0, 0);
  Reg.Free;
end;
Calling and Changing Delphi’s Own Event Handlers
The last wizard we’ll build in this chapter is a bit strange. We’ve called it the Rebuild Wizard, and it started out as a tool built by Marco to master the compilation of his Mastering Delphi 3 book examples. Although it might not be terribly useful for other purposes, it demonstrates a few low-level and interesting tricks, as well as a couple of generic algorithms, so it should be worth studying the code.
The Form of the Rebuild Wizard
The purpose of this wizard is simple: we want to list all the Delphi project files in a given directory and its subdirectories, and then be able to issue a Build All the Projects command that will build each project, one by one. Creating the list of Delphi project files isn’t too difficult. The wizard’s main form displays an edit box to choose the initial directory, and a list box that will display the names of the projects we find. By the way, when you double-click on the edit box, the wizard calls the SelectDirectory VCL global procedure to let you choose a directory graphically:
procedure TRebWizForm.EditDirDblClick(Sender: TObject);
var
  Dir: string;
begin
  if SelectDirectory (Dir, [], 0) then
    EditDir.Text := Dir;
end;
Once we’ve set the starting directory, the user can press the List button to fill in the list box with the names of the available project files. The OnClick event handler of this button uses a hidden FileListBox component to list all the DPR files in the directory. Then we use the same component to select the subdirectories and repeat the process for each of them. Here’s the complete code:
procedure TRebWizForm.BtnListClick(Sender: TObject);
begin
  ListBoxFiles.Items.Clear;
  FileListbox1.Directory := EditDir.Text;
  ExamineDir;
  // enable all buttons
  BtnOpen.Enabled := True;
  BtnCompOne.Enabled := True;
  BtnCompileAll.Enabled := True;
end;

procedure TRebWizForm.ExamineDir;
var
  FileList: TStrings;
  I: Integer;
  CurrDir: string;
begin
  // examining .dpr files
  FileListBox1.Mask := '*.dpr';
  FileListBox1.FileType := [ftNormal];
  FileList := TStringList.Create;
  try
    FileList.Assign(FileListBox1.Items);
    // for each file, add its path to the list
    for I := 0 to FileList.Count - 1 do
    begin
      ListBoxFiles.Items.Add (FileListbox1.Directory +
        '\' + FileList[I]);
    end;

    // examine sub directorties
    FileListBox1.Mask := '*.*';
    FileListBox1.FileType := [ftDirectory];
    FileList.Assign(FileListBox1.Items);
    CurrDir := FileListbox1.Directory;
    // for each dir re-examine...
    for I := 2 to FileList.Count - 1 do
    begin
      FileListbox1.Directory :=
        CurrDir + '\' + Copy (FileList[I], 2,
          Length (FileList [I]) - 2);
      ExamineDir;
    end;
    FileListbox1.Directory := CurrDir;
  finally
    FileList.Free;
  end;
end;
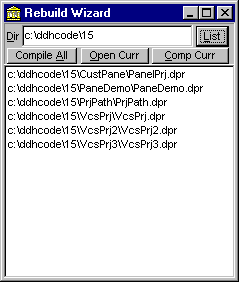
Once you have the project file list (shown in Figure 15.16) you can easily open any project in the Delphi environment:
procedure TRebWizForm.BtnOpenClick(Sender: TObject);
var
  CurrPrj: string;
begin
  with ListBoxFiles do
    CurrPrj := Items [ItemIndex];
  ToolServices.OpenProject (CurrPrj);
end;
Figure 15.16: A list of projects selected in the Rebuild Wizard. You can compile them all with a single mouse click.

Activating a Delphi Menu Item
At this point, how do we compile the projects? We want to call the Rebuild All command, but there isn’t a shortcut key for it, so we can’t simply send the keystroke as we did for the Run menu command of the AddIn component editor built in Chapter 13. There are two alternatives: you can search for the necessary menu item and activate its OnClick event handler, or you can locate the appropriate event handler directly. We’ll explore the first method soon, but for now let’s look at the second and more complex one.All the event handlers for a form are published methods, and so Delphi must export them as part of the class’s RTTI information. Therefore, you can use the TObject class’s MethodAddress method to return the address of the appropriate event handler. But how do you call this method once you have its address? You must pass the method address and the associated object to a TMethod record, and then cast it and call it as you would any other event handler. Sound complex? It is, but there isn’t much code:
procedure TRebWizForm.DoCompile;
var
  ObjDelphi: TWinControl;
  Meth: TMethod;
  Evt: TNotifyEvent;
  P: Pointer;
begin
  ObjDelphi := Application.MainForm;
  P := ObjDelphi.MethodAddress ('ProjectBuild');
  Meth.Code := P;
  Meth.Data := ObjDelphi;
  Evt := TNotifyEvent (Meth);
  Evt (ObjDelphi);
end;
To write this code we simply had to know the name of the event handler, something we found by inspecting the Delphi system (although the Delphi Exposed tool we’ve shown you doesn’t deliver this particular piece of information). Now you can compile a specific project or all of them:
procedure TRebWizForm.BtnCompOneClick(Sender: TObject);
var
  CurrPrj: string;
begin
  with ListBoxFiles do
    CurrPrj := Items [ItemIndex];
  ToolServices.OpenProject (CurrPrj);
  DoCompile;
end;

procedure TRebWizForm.BtnCompileAllClick(Sender: TObject);
var
  CurrPrj: string;
  I: Integer;
begin
  with ListBoxFiles do
    for I := 0 to Items.Count - 1 do
    begin
      CurrPrj := Items [I];
      ToolServices.OpenProject (CurrPrj);
      DoCompile;
    end;
end;
- If you have the Delphi environment option Show Compiler Progress active, you’ll be asked to press the message box’s OK button after compiling every project, but you’ll also be able to keep track of any errors easily. If you disable this option, the wizard will compile all the projects without any manual intervention.
A Wizard with a Modeless Form
All the wizards we’ve built up to now have displayed modal forms. In this case, we need to display a modeless form, because we want to be able to open and work on several projects, and keep the wizard’s form open. The Execute method creates the form only if it we haven’t already done so:
procedure TRebuildWiz.Execute;
begin
  // the actual code
  if not Assigned (RebWizForm) then
    RebWizForm := TRebWizForm.Create (nil);
  RebWizForm.Show;
end;
We’ll destroy the form later when the user closes it:
procedure TRebWizForm.FormClose(Sender: TObject; var Action: TCloseAction);
begin
  Action := caFree;
  RebWizForm := nil;
end;
However, the user might happen to close Delphi or remove a package without closing the wizard first. In either case we can solve the problem by adding a finalization section to the wizard’s unit:
initialization
  RebWizForm := nil;

finalization
  if Assigned (RebWizForm) then
    RebWizForm.Free;
Hooking to a Delphi Menu Item
The final step is to alter the Rebuild All menu item’s event handler. The biggest problem here is to determine when we should perform this operation. Using the wizard unit’s initialization and finalization sections might work, as well as using the Register procedure for the startup code as we did in the last wizard. There’s a third alternative, which is probably more sound from an OOP perspective: add a constructor and a destructor to the wizard class:
type
  TRebuildWiz = class (TIExpert)
  private
    OriginalBuildClick: TNotifyEvent;
    BuildMenu: TMenuItem;
  public
    constructor Create;
    destructor Destroy; override;
    procedure BuildClick (Sender: TObject);
    // standard methods
    function GetStyle: TExpertStyle; override;
    function GetName: string; override;
    ...
- You’ll notice that we haven’t marked the constructor with the override keyword. This is because the TIExpert class’s constructor isn’t virtual. However, this isn’t a problem, because the only instance of the wizard object that will exist is the one we create in the Register procedure.
constructor TRebuildWiz.Create;
begin
  inherited;
  // change the event handler of the Build menu item
  BuildMenu := Application.MainForm.
    FindComponent ('ProjectBuildItem') as TMenuItem;
  OriginalBuildClick := BuildMenu.OnClick;
  BuildMenu.OnClick := BuildClick;
end;

destructor TRebuildWiz.Destroy;
begin
  // restore the event handler
  BuildMenu.OnClick := OriginalBuildClick;
  inherited;
end;
Now let’s look at the code of the new event handler. It simply asks the user whether to execute the wizard or the standard Rebuild All functionality. If the user chooses the wizard, they have the option of rebuilding all the selected projects automatically:
procedure TRebuildWiz.BuildClick (Sender: TObject);
begin
  if MessageDlg ('Do you want to open the Rebuild Wizard',
    mtConfirmation, [mbYes, mbNo], 0) = idYes then
  begin
    Execute;
    if MessageDlg ('Do you want to Rebuild All the projects now?',
        mtConfirmation, [mbYes, mbNo], 0) = idYes then
      RebWizForm.BtnCompileAllClick (self);
  end
  else
    OriginalBuildClick (Sender);
end;
Of course there’s no guarantee that this code will work in a new version of Delphi (internal event handler names may change dramatically), but that is also the case for the other wizards in the final portion of this chapter. However, it’s worth noticing that we’ve hooked into the Delphi menu item in a much simpler manner than by using the ToolsAPI menu item interfaces. The only significant drawback is that this code is available only for DCU-based add-ins, and not for external DLLs (although it does work from within a package, which is not very different from a DLL).