
Mastering Delphi 3
Chapter 21
Copyright Marco Cantù 1997 - This chapter is part of the book Mastering Delphi 3, published by Sybex, ISBN 0-7821-2052-0. You can store or print this file for personal use but you are not allowed to distribute it in printed or electronic format, in CD-ROMs or through the Web, without written permission from the author. Links to this site are welcome.
CHAPTER 21: OLE AND COM
- What are OLE and COM?
- Objects in DLLs
- COM, GUIDs, and class factories
- Using Delphi 3 interfaces
- Using Windows 95 shell interfaces
This chapter shows that OLE is simpler that you probably think. OLE seems difficult because there are very few clear descriptions of what OLE is. In this chapter, we'll build our first COM object though a series of steps, starting with a plain Delphi DLL; this will help you understand the key elements of OLE technology.
Towards the end of this chapter I'll also show you some examples of using the OLE interfaces included in the Win32 API. Actual applications of OLE will appear in the next and the following chapters.
What Is OLE? And What Is COM?
Part of the confusion related to OLE technology comes from the fact that Microsoft has used this name for different purposes. Everything started with Object Linking and Embedding (OLE, for short) which was an extension of the DDE (Dynamic Data Exchange) model.
Using the Clipboard allows you to copy some raw data, and using DDE allows you to connect parts of two documents, Object Linking and Embedding allows you to copy the data from a server application to the client application, along with some information regarding the server, or a reference to some information stored in the Windows Registry. The raw data might be copied along with the link (Object Embedding) or kept in the original file (OLE Linking). We'll discuss this technology in more detail in the next chapter.
Note: Object Linking and Embedding documents have been renamed as OLE Documents, and now as Active Documents.
Microsoft updated OLE to OLE 2 and started adding new features, such as OLE Automation and OLE Controls. The next step was to build the Windows shell using OLE technology and interfaces, and then to rename the OLE Controls (previously known also as OCX) as ActiveX controls, allowing for lightweight controls suitable for distribution over the Internet.
As this technology was extended and became increasingly important to the Windows platform, Microsoft changed the name to OLE. This is no longer an abbreviation, but simply a name. These changes in naming only partially relate to technological changes and are driven to a large extent by marketing purposes.
What, then, is OLE? Basically, OLE is a technology that defines a standard way a client module and a server module can communicate though a specific interface. Here, "module" indicates an application or a library (a DLL), which can execute on the same or on different computers. There are many possible interfaces, depending on the role of the client and server, and you can even add new interfaces for specific purposes. These interfaces are implemented by server objects. A server object usually implements more than one interface, and all the server objects have a few common capabilities, since they must all implement the IUnknown interface. This is a very short description of the object model used by OLE, the Component Object Model.
By definition, COM is the implementation of OLE. In practice the terms OLE and COM are often used almost interchangeably. COM specifies the technical details of OLE, and any COM-compliant language can be used to write COM/OLE objects. C and C++ were the original languages used to write this code, but Delphi is fully compliant with COM. Actually, by looking at the source code, Object Pascal seems to be easier to use than C++ to write COM objects. This simplicity mainly derives from the introduction of interfaces in Delphi 3. By the way, this same idea of interfaces is used to integrate Java with COM on the Windows platform.
Note: For a full description of OLE and COM, the best reference is Kraig Brockschmidt's Inside OLE, 2nd edition, published by Microsoft Press. This book is the ultimate guide to OLE-but not a simple one-with examples in C++ and C. The book does not include Delphi code, though.
If OLE is a set of interfaces, it is important to note that these interfaces serve to communicate between two software modules, two executable files, or one executable file and a DLL. Implementing objects in DLLs is generally simpler, because in Windows 95 a program and the DLL it uses reside in the same memory address space. This means that if the program passes a memory address to the DLL, the address remains valid. When you use two executable files, OLE has a lot of work to do behind the scenes to let the two applications communicate. This mechanism is called marshaling.
Note that a DLL implementing OLE objects is described as an in-process server, while if the sever is a separate executable, it is called an out-of-process server. Throughout most of this chapter, we'll look at in-process servers, that is, an OLE server inside a DLL. The next chapters will also cover out-of process servers. But first we need to learn how a DLL can export an object in Delphi.
Objects in DLLs
As we saw in the last chapter, DLLs are collections of functions. However, it is possible to place a class definition inside a DLL and then use objects of this class in a program which links to the DLL. Actually, a DLL doesn't usually export a class: it exports the virtual methods of the objects of that class.
In other words, the DLL should create the objects of the class. When the DLL has created an object, it can return the object to the calling application. Since every object contains a pointer to its virtual method table (see the section on late binding in Chapter 5), when the DLL returns the object it automatically returns also the memory addresses of the virtual methods of the class of the object. Of course, the executable file should be able to recognize these objects, so it should have a class declaration similar to the one inside the DLL.
Writing the Class in the DLL
In the next example, called DllObj, I'm going to show you how you can define a class inside a DLL and export its virtual methods. The DLL project includes a unit with the definition of the abstract class we want to export and a second unit with the definition of the implementation class. This is the definition of the abstract class in the first unit, called Base:
type
  TDllNumber = class
  public
    function GetValue: Integer; virtual; abstract;
    procedure SetValue (New: Integer); virtual; abstract;
    procedure Increase; virtual; abstract;
  end;
Note: A class of this kind, with only
virtual abstract method, is often called a purely abstract
class. This structure is actually very close to an interface,
as we'll see in a while.
This TDllNumber class is so simple as to be almost useless, but I want you to concentrate on the techniques used to make this work, more than on the class itself. In this class declaration, you should notice that all the methods, must be virtual abstract. Only virtual methods are added to the VTable (or virtual method table), and only these methods can be exported from the DLL.
The implementation class is derived from this abstract class, and is in a separate unit of the DLL:
type
  TDllNumberImpl = class (TDllNumber)
  private
    Value: Integer;
  public
    constructor Create;
    function GetValue: Integer; override;
    procedure SetValue (New: Integer); override;
    procedure Increase; override;
  end;
The actual code of the class has nothing special. It is really straightforward:
constructor TDllNumberImpl.Create;
begin
  Value := 0;
  inherited Create;
end;

function TDllNumberImpl.GetValue: Integer;
begin
  Result := Value;
end;

procedure TDllNumberImpl.SetValue (New: Integer);
begin
  Value := New;
end;

procedure TDllNumberImpl.Increase;
begin
  Inc (Value);
end;
Beside the class we've just seen, the second unit of the DLL should include a function used to create an object of the class:
function NewObject: TDllNumber;
begin
  Result := TDllNumberImpl.Create;
end;
Again, this function is very simple. The function has to be declared as stdcall, and you should also add it to the exports clause of the DLL project file:
library DllObj;

uses
  DllClass in 'DllClass.pas';

exports
  NewObject;

end.
This is all we need to do to export a Delphi class from a DLL. Actually we could have omitted the base class, and have written a single class with all its methods virtual, but the approach I've used (defining an abstract class and an implementation class) is a more elegant, and requires just a little extra effort. This is not already a COM-compliant class, but I'll update it in later examples.
Using a Class from a DLL
Now we can try to use this class in a program, creating a couple of objects. The first thing we must do in the program is to re-declare the class. Since the declaration of the abstract class is in a separate unit, we can simply refer to this unit in the program. However, this time we are not going to write the implementation class, since we'll relay on that of the DLL. In fact the virtual abstract methods of the definition of the base class are used only as a placeholder to build the correct VTable of the class of the DLL also in the program using it.
Actually what matters in the client program is to have an interface with the virtual methods with the same parameters and listed in the same orders. In fact I could have even re-declared the abstract class with methods having different names, as in:
type
  TDllNumber = class
  public
    function GetValue: Integer; virtual; abstract;
    procedure SetValue (New: Integer); virtual; abstract;
    procedure Inc; virtual; abstract;
  end;
The difference here is that I've changed the name of a method, from Increase to Inc. This won't affect the program at all!
Note: The reason that a change in the method name doesn't affect the behavior of the program is quite complex. We have two class declarations, one in the DLL and one in the program. In these two declarations what matters is the order of the virtual methods, and their parameters--not their names. In fact, when a Delphi program calls a virtual function, it calls the function whose address is stored in a given position of the VTable. So if this is the third virtual method of the local copy of the class, it will correspond to the third position of the VTable of the actual class defined by the DLL. This is why it is vital to keep the same order in the two definitions, and why the names have little value. If you change the order of the definitions, writing Inc before SetValue, the executable program will look to the second method of the VTable and find the wrong method!
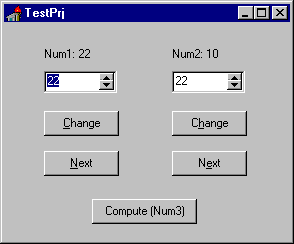
The test program is actually very simple. You can see its form at run-time in Figure 21.1. When the form is created, the program creates two objects of the class TDllNumber (declared as private fields of the class) by calling the DLL function, reads the initial values of the two objects from two SpinEdit controls, and then shows the current values of the objects in two labels:
procedure TForm1.FormCreate(Sender: TObject);
begin
  // first create the object
  Num1 := NewObject;
  Num1.SetValue (SpinEdit1.Value);
  Label1.Caption := 'Num1: ' + IntToStr (Num1.GetValue);
  // create second object
  Num2 := NewObject;
  Num2.SetValue (SpinEdit2.Value);
  Label2.Caption := 'Num2: ' + IntToStr (Num2.GetValue);
end;
The DLL function is re-declared as usual:
function NewObject: TDllNumber; stdcall;
    external 'DllObj.dll';
Figure 21.1: The output of the TestPrj example used to test the DllObj library, a DLL exporting the methods of a class.

This declaration is actually very important, because makes the DLL get automatically loaded when the program starts. Without this function the executable file and the DLL would have no connection.
Here is the code of the two buttons related to the first object:
procedure TForm1.Button1Click(Sender: TObject);
begin
  // change
  Num1.SetValue (SpinEdit1.Value);
  Label1.Caption := 'Num1: ' + IntToStr (Num1.GetValue);
end;

procedure TForm1.Button2Click(Sender: TObject);
begin
  Num1.Increase;
  Label1.Caption := 'Num1: ' + IntToStr (Num1.GetValue);
end;
As you can see, once we have asked the DLL to create the object, we use it as any other regular Delphi object. The difference is that the methods we invoke are part of the DLL, not part of our executable file. There is one final event handler in the test program, which is used to destroy the objects:
procedure TForm1.FormDestroy(Sender: TObject);
begin
  Num1.Free;
  Num2.Free;
end;
In the FormDestroy method, we can call the Free method of each object. The Free method will then call the Destroy destructor of the two objects, as usual. This is important, because Delphi objects have one more virtual method than those listed in the class declaration-the Destroy virtual destructor.
Implementing IUnknown
To turn our simple object into a COM object, we have to implement the IUnknown interface, providing the three standard COM methods: Add, Release, and QueryInterface. Delphi 3 provides built-in support for these features using the new interface keyword, already introduced in Chapter 6. Here is the definition of the IUnknown interface:
type
  IUnknown = interface
    ['{00000000-0000-0000-C000-000000000046}']
    function QueryInterface(const IID: TGUID; out Obj): Integer; stdcall;
    function _AddRef: Integer; stdcall;
    function _Release: Integer; stdcall;
  end;
The AddRef and Release methods are used to implement reference counting. The QueryInterface method handles the type information and type compatibility of the objects.
Note: In the code above you can see an example of an out parameter, a parameter passed back from the method to the calling program, but without an initial value passed by the calling program to the method.
Implementing IUnknown Methods
Delphi actually implements these methods in a couple of classes. One of them is TInterfacedObject a very simple implementation of the interface:
type
  TInterfacedObject = class(TObject, IUnknown)
  private
    FRefCount: Integer;
  protected
    function QueryInterface(const IID: TGUID; out Obj): Integer; stdcall;
    function _AddRef: Integer; stdcall;
    function _Release: Integer; stdcall;
  public
    property RefCount: Integer read FRefCount;
  end;
Here is the implementation of the two methods for reference counting, which are quite simple:
function TInterfacedObject._AddRef: Integer;
begin
  Inc(FRefCount);
  Result := FRefCount;
end;

function TInterfacedObject._Release: Integer;
begin
  Dec(FRefCount);
  if FRefCount = 0 then
  begin
    Destroy;
    Result := 0;
    Exit;
  end;
  Result := FRefCount;
end;
The most complex method is QueryInterface, which in Delphi is actually implemented through the GetInterface method of the TObject class:
function TInterfacedObject.QueryInterface(
  const IID: TGUID; out Obj): Integer;
const
  E_NOINTERFACE = $80004002;
begin
  if GetInterface(IID, Obj) then
    Result := 0
  else
    Result := E_NOINTERFACE;
end;
The role of the QueryInterface method is twofold:
- QueryInterface is used for type checking. The program can ask an object: Are you of the type I'm interested in? Do you implement the interface, the methods I want to call? If the answer is no, the program can look for another object, maybe asking another server.
- If the answer is yes, QueryInterface usually returns a pointer to the object, using its reference output parameter (out).
To understand the role of the QueryInterrface method it is important to keep in mind that a COM object can implement multiple interfaces. When you call QueryInterface you might ask for one of the possible interfaces of the object, using the TGUID parameter.
A COM class, in general, can implement multiple interfaces
besides IUnknown, which means we might need to return a specific portion of the
VTable. In Delphi 2 this was very difficult to accomplish, while
in C++ you can easily obtain it using multiple inheritance. Delphi
3 interfaces solve the problem in a very elegant way. In fact
a single class can have implement multiple interfaces.
Global Unique Identifiers
The QueryInterface method has a special parameter, of the TGUID type. This is an ID which identifies any COM server class and any interface in the system. When you want to know if an object supports a specific interface, you ask the object if it implements the interface which has a given ID (which for the default OLE interfaces is determined by Microsoft).
Another ID is used to indicate a specific class, a specific server. The Windows Registry stores this ID, with indications of the related DLL or executable file. The developers of an OLE server define the class identifier.
Both these IDs are indicated as GUID, or Globally Unique IDentifiers. If each developer uses a number to indicate its own OLE servers, how can we be sure that these values are not duplicated? The short answer is that we cannot. The real answer is that a GUID is such a long number (with 16 bytes, or 128 bits, or a number with 38 digits!) that it is statistically impossible to come up with two random numbers having the same value. Moreover, programmers should use a specific API call, CoCreateGuid (or use an option of their programming environments to call it), to come up with a GUID which depends on the time and date, the network card ID, the calling program, and other information.
Delphi defines a TGUID data type (in the System unit) to hold these numbers:
type
  TGUID = record
    D1: Integer;
    D2: Word;
    D3: Word;
    D4: array[0..7] of Byte;
  end;
This structure is actually quite odd but is required by Windows. You can assign a value to a GUID using the standard hexadecimal notation, as in this code fragment:
const
  Class_ActiveForm1: TGUID =
    '{1AFA6D61-7B89-11D0-98D0-444553540000}';
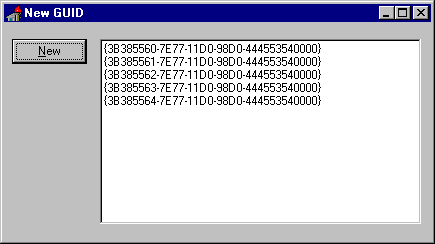
In case you need a GUID, I've written a small program to generate them. The NewGuid example simply calls the CoCreateGuid function and then adds the result to the text of a memo. You can easily copy the definition from the memo into your code.
Note: Besides being careful not to copy the GUID from someone else's program (which can end up in two completely different COM objects using the same GUID), you should never make up your own ID entering a casual sequence of numbers. Windows checks the IDs, and using a casual sequence won't generate a valid ID. An OLE server with an invalid ID is not recognized, but you won't get an error message!
Here is the code of the OnClick event of the only button of the form of the NewGuid example (you can see an example of this code in Figure 21.2):
uses
  ComObj, ActiveX;

procedure TForm1.BtnNewClick(Sender: TObject);
var
  ID: TGUID;
  S: string;
begin
  if CoCreateGuid (Id) = s_OK then
  begin
    s := GUIDToString (Id);

    Memo1.Lines.Add (S);
  end;
end;
Figure 21.2: An example of the GUIDs generated by the NewGuid example. Values depend on my computer and the time I run this program.
Note: The Delphi unit defining OLE functions and data types used to be called Ole2 in Delphi 2. In Delphi 3 this unit is replaced by the ActiveX and ComObj units, which use the new interface mechanism. You should now use these new units exclusively.
Beside the GUIDToStrign function, Delphi includes also the opposite one, StrintToGUID. You can also use the corresponding Windows API functions, such as StringFromGuid2, but in this case you must use the WideString type instead of the string type. Any time OLE is involved you have to use the WideString type, unless you use Delphi functions which automatically do the required conversion for you. Actually, OLE API functions use the PWChar type (pointer to null-terminated arrays of wide characters), but simply casting a WideString to PWChar does the trick.
By looking at the output in Figure 21.2, or by running the program, you can see that a single application gets a consecutive set of GUIDs. This doesn't depend on time: pressing the button faster or slower always generates numbers in sequence. But if you run another copy of the program, it will have a new sequence of values.
Note: Keep in mind that GUIDs come in two different forms: Interface ID, which refers to an interface, and Class ID, which refers to a specific object in a server. These two kinds of IDs both use the GUID style, and are often indicated as GUIDs. The difference between these different kinds of IDs is so subtle that the terms are often used interchangeably.
The Role of Class Factories
The first program we have written, with a DLL exporting a class, worked because we were in a closed environment-that is, we wrote the server and the only client which is ever going to use it. To make it a truly standard COM object, we must implement the IUnknown interface, define a GUID, and replace the custom NewObject function with the DllGetClassObject function. In fact, when we register the GUID of the object in the registry, we can use a specific API function to create the object, such as the CreateComObject API:
function CreateComObject(const ClassID: TGUID): IUnknown;
This API function will look into the registry, find the server registering the object with the given GUID, load it, and, if the server is a DLL, call the DLLGetClassObject method of the DLL. This is a function every in-process server must provide and export:
function DllGetClassObject(const CLSID, IID: TGUID;
  var Obj): HResult; stdcall;
This API function receives as parameter the requested class and interface, and returns an object in its reference parameter. The object returned by this function is a class factory.
Now, what is a class factory? As the name suggests, a class factory is an object capable of creating other objects. Each server can have multiple objects. The server exposes the class factory, and the class factory can create one of these various objects. Each object, then, can have a number of interfaces. One of the many advantages of the Delphi 3 simplified approach to COM development is that the system can provide a class factory for us. For this reason, I'm not going to add a class factory to our simple example.
The call to the CreateComObject API doesn't stop at the creation of the class factory, however. After retrieving the class factory, CreateComObject calls the CreateInstance method of the IClassFactory interface. This method creates the requested object and returns it. If no error occurs, this object becomes the return value of the CreateComObject API.
By setting up all this mechanism (including the class factory and the DLLGetClassObject call), you gain the advantage of a very simple object creation: CreateComObject is just a simple function call with a complex behavior behind the scenes. What's great in Delphi 3 is that the complex mechanism is handled for you by the runtime system. So it's time, in fact, to start looking in detail how Delphi 3 makes COM really easy to master.
Using Delphi 3 COM Interfaces
We can now take our example and turn it into the new FirstCom example, which has similar capabilities to the custom DllObj example but uses a standard Delphi 3 COM approach.
Here is the definition of the class exported by the library, which is now an interface:
type
  INumber = interface
    ['{B4131140-7C2F-11D0-98D0-444553540000}']
    function GetValue: Integer; stdcall;
    procedure SetValue (New: Integer); stdcall;
    procedure Increase; stdcall;
  end;
Again, do not copy this IID (Interface ID) in your code, but generate a new one for your examples. After declaring the custom interface, the server declares an actual object implementing the interface:
type
  TDllNumber = class (TComObject, INumber)
  private
    Value: Integer;
  public
    function GetValue: Integer; virtual; stdcall;
    procedure SetValue (New: Integer); virtual; stdcall;
    procedure Increase; virtual; stdcall;
    procedure Initialize; override;
    destructor Destroy; override;
  end;
The TComObject Class
The TDllNumber class inherits from the standard TComObject class, provided by the Delphi 3 ComObj unit and implementing a default COM object. This class is similar to the TInterfacedObject class we've seen before, but a little more complex. This is the public portion of the TComObject class declaration:
type
  TComObject = class(TObject, IUnknown, ISupportErrorInfo)
    ...
  public
    constructor Create;
    constructor CreateAggregated(const Controller: IUnknown);
    constructor CreateFromFactory(Factory: TComObjectFactory;
      const Controller: IUnknown);
    destructor Destroy; override;
    procedure Initialize; virtual;
    function ObjAddRef: Integer; virtual; stdcall;
    function ObjQueryInterface(const IID: TGUID; out Obj):
      Integer; virtual; stdcall;
    function ObjRelease: Integer; virtual; stdcall;
    function SafeCallException(ExceptObject: TObject;
      ExceptAddr: Pointer): HResult; override;
    property Controller: IUnknown read GetController;
    property Factory: TComObjectFactory read FFactory;
    property RefCount: Integer read FRefCount;
  end;
This class implements the IUnknown interface (ObjAddRef, ObjQueryInterface, and ObjRelease methods) and the ISupportErrorInfo interface (though the InterfaceSupportsErrorInfo protected method). It also has a few read-only properties you can use to get information about the class and the status of the object. In our example we simply inherit from this base class, but we do not care too much about the implementation of this base class, which provides us with the basic COM functionality.
SIDEBAR: OTHER DELPHI COM CLASSES
Beside the TComObject class we are using in this example and the TInterfacedObject class we've used in Chapter 6 and seen earlier in this chapter, Delphi 3 includes several other predefined COM classes. We'll use them in the following chapters. However I want to give you an overall picture of these classes at this point. Here is the list with the most important COM classes of the Delphi VCL (you can see a hierarchy graph of these classes in Chapter 7):
- TInterfacedObject, defined in the System unit, inherits from TObject and implements the IUnknown interface.
- TComObject, defined in the ComObj unit, inherits from TObject and implements both the IUnknown interface and the ISupportErrorInfo interface.
- TTypedComObject, defined in the ComObj unit, inherits from TComObject and implements the IProvideClassInfo interface (beside the IUnknown and ISupportErrorInfo interfaces already implemented by the base class, TComObject).
- TAutoObject, defined in the ComObj unit, inherits from TTypedComObject and implements also the IDispatch interface.
- TActiveXControl, defined in the AxCtrls unit, inherits from TAutoObject and implements a number of interfaces (IPersistStreamInit, IPersistStorage, IOleObject, IOleControl, to name just a few).
Delphi defines also a class factory for each of these classes. The class factory classes form another hierarchy, with the same structure. Their names are TComObjectFactory, TTypedComObjectFactory, TAutoObjectFactory, and TActiveXControlFactory.
Initializing the COM Object
What we absolutely need to know is that the non-virtual constructor of the TComObject class calls the virtual Initialize method. If we want to customize the creation of an object, and initialize it, we should not define a new constructor (which will never be called). What we should do is override its Initialize method, as I've done in the TDllNumber class above. I've also overridden the destructor of the class, because I wanted to test the automatic destruction of the COM objects provided by Delphi. Here is the code for this pseudo-constructor and the destructor:
procedure TDllNumber.Initialize;
begin
  inherited;
  Value := 10;
end;

destructor TDllNumber.Destroy;
begin
  inherited;
  MessageBox (0, 'Object Destroyed',
    'TDLLNumber', mb_OK); // API call
end;
In the first method, calling the inherited version is good practice, even though the TComObject.Initialize method has no code in this version of Delphi. The destructor, instead, must call the base class version. This is the code required to make our COM object work properly. The code of the other three methods, the custom methods of the INumber interface, is always the same very simple code of the last two examples, so I won't even list it here.
You must do a few more things to complete the example. First, we should provide a class ID for the server object, possibly using a constant:
const
  CLSID_TDllNumber: TGUID =
    '{95D47840-7C4D-11D0-98D0-444553540000}';
The second is to provide a class factory. Luckily Delphi 3 includes a ready-to-use class factory for TComObject derived classes, called TComObjectFactory. This class implements both the IUnknown and the IClassFactory interfaces, and exports a number of properties, as you can see its public interface:
type
  TComObjectFactory = class(TObject,
    IUnknown, IClassFactory)
  ...
  public
    constructor Create(ComServer: TComServerObject;
      ComClass: TComClass; const ClassID: TGUID;
      const ClassName, Description: string;
      Instancing: TClassInstancing);
    destructor Destroy; override;
    function CreateComObject(
      const Controller: IUnknown): TComObject; virtual;
    procedure RegisterClassObject;
    procedure UpdateRegistry(Register: Boolean); virtual;
    property ClassID: TGUID read FClassID;
    property ClassName: string read FClassName;
    property ComClass: TClass read FComClass;
    property ComServer: TComServerObject
      read FComServer;
    property Description: string read FDescription;
    property ErrorIID: TGUID
      read FErrorIID write FErrorIID;
    property ProgID: string read GetProgID;
    property Instancing: TClassInstancing
      read FInstancing;
  end;
All we need to do is to create a global object of this class in the unit defining our COM-compatible class. We can accomplish this in the initialization section of the unit:
initialization
  TComObjectFactory.Create(ComServer, TDllNumber, CLSID_TDllNumber,
    'Md3.FirstCom', 'Md3 First COM Server', ciMultiInstance);
end.
The above code creates an object of the factory class, passing as parameters a ComServer object, the class reference to the class we've just defined (TDllNumber), the GUID we've just defined for the class, the server name, the server description, and the kind of instancing we want to use.
The global ComServer object, defined in the ComServ unit, is a manager of the class factory available in that unit. It uses its own ForEachFactory method to look for the class supporting a given COM object request, and keeps track of the number of allocated objects.
There are two more steps required to make our server fully COM-compliant. We must provide the proper interface functions and a registration mechanism. This is actually quite simple, because the ComServ unit provides these functions for us. So our server should simply export them. Here is the project source code for the FirstCom server example:
library FirstCom;

uses
  ComServ,
  DllClass in 'DllClass.pas';

exports
  DllGetClassObject resident,
  DllCanUnloadNow resident,
  DllRegisterServer resident,
  DllUnregisterServer resident;
end.
Note: The use of the resident directive for DLL exports is a form of optimization. These functions are always kept in memory, making them fast to call even if they haven't been used for a while (which might cause Windows to move them to a swap file).
To register this server you can simply compile its code, then use the Run Register ActiveX Server menu command of Delphi. You do this to register the server on your own machine, with the results you can see in Figure 21.3. When you distribute this server, you should install it on the client computers. This can be accomplished in several ways: you can write a .REG file to install in the registry, pass the DLL as command line parameter to the use Microsoft's REGSVR32.EXE found in the windows/system directory, or use the similar RegSvr demo program which ships with Delphi.
Figure 21.3: The new registered server in Windows 95 RegEdit.

Now we can turn to the client side of our example. This time the example is called TestCOM and is stored in a separate directory. I've done this to underline that now the program loads the server DLL though the OLE/COM mechanism, thanks to the server information present in the registry, so it's not necessary for the client to know in which directory the server resides.
Updating the COM Client Program
In the client program I must re-declare the interface and the COM server GUID (although I could have placed them in a common unit, used by both the server and the client, I decided not to do this extra work in such a simple example):
const
  CLSID_TDllNumber: TGUID =
    '{95D47840-7C4D-11D0-98D0-444553540000}';

type
  INumber = interface
    ['{B4131140-7C2F-11D0-98D0-444553540000}']
    function GetValue: Integer; stdcall;
    procedure SetValue (New: Integer); stdcall;
    procedure Increase; stdcall;
  end;
Of course the code of the FormCreate method of the example should now be updated. The program starts with all the buttons disabled (at design-time), and enables them only after an object has been created. This way, if an exception is raised while creating one of the objects, the buttons related to the object won't be enabled:
procedure TForm1.FormCreate(Sender: TObject);
begin
  // create first object
  Num1 := CreateComObject (CLSID_TDllNumber) as INumber;
  Num1.SetValue (SpinEdit1.Value);
  Label1.Caption := 'Num1: ' + IntToStr (Num1.GetValue);
  Button1.Enabled := True;
  Button2.Enabled := True;

  // create second object
  Num2 := CreateComObject (CLSID_TDllNumber) as INumber;
  Label2.Caption := 'Num2: ' + IntToStr (Num2.GetValue);
  Button3.Enabled := True;
  Button4.Enabled := True;
end;
Notice in particular the call to CreateComObject and the following as cast. The API call starts the COM object-construction mechanism I've already described in detail. This call also dynamically loads the server DLL. The return value is an IUnknown object. This object must be converted to the proper interface type before assigning it to the Num1 and Num2 fields, which now have the interface type INumber as data type.
Note: To downcast an interface to the actual type always use the as cast (as already shown in Chapter 6). This provides you with some protection, because it raises an exception in case the interface you are casting to is not supported by the given object. In the case of interfaces the as cast is the only way to extract an interface from an object. If you write a plain cast of the form INumber(CreateComObject (CLSID_TDllNumber)) the program will invariably crash, even if the cast seems to make sense as in the case above. Casting an interface pointer to another interface pointer is an error. Period. Never do it.
In Figure 21.4 you can see the output of this test program, which is very similar to the previous versions. Notice that, this time, Num2 shows the initial value of the object at startup, as set up in its Initialize method. Notice also that I've added one more button, which creates a third temporary COM object:
procedure TForm1.Button5Click(Sender: TObject);
var
  Num3: INumber;
begin
  // create a new temporary COM object
  Num3 := CreateComObject (CLSID_TDllNumber) as INumber;
  Num3.SetValue (100);
  Num3.Increase;
  ShowMessage ('Num3: ' + IntToStr (Num3.GetValue));
end;
Figure 21.4: The output of the TestCom example, which is very similar to previous examples, but uses a fully COM-compliant approach.
Pressing this button, you simply get the value of the number following one hundred. The reason I added this method to the example actually doesn't relate to its output (you already knew that 100 plus one is 101, didn't you?). If you press the button, in fact, after the message showing the result, you get a second message indicating that the object has been destroyed. Simply letting an interface object go out of scope, the Release method of object is automatically called, the reference count of the object is decreased, and the object is then eventually destroyed if its reference count reaches zero. I have already described this reference-counting mechanism in Chapter 6, so you can refer to that chapter for more details.
The same happens for the other two objects as soon as the program terminates. Even if the program doesn't explicitly destroys the two objects in the FormDestroy method, they are indeed destroyed, as the message shown by their Destroy destructor clearly demonstrates. This happens because they were declared of an interface type.
Using Interface Properties
As a further small step, we can improve the example by adding to the INumber interface a property. When you add a property to an interface you indicate the data type, and then the read and write directives. You can have read-only or write-only properties, but the read and write clauses must always refer to a method because interfaces don't hold anything else but methods.
Here is the updated interface, which is part of the PropCom example:
type
  INumberProp = interface
    ['{B36C5800-8E59-11D0-98D0-444553540000}']
    function GetValue: Integer; stdcall;
    procedure SetValue (New: Integer); stdcall;
    property Value: Integer
      read GetValue write SetValue;
    procedure Increase; stdcall;
  end;
I've given this interface a new name and, what's even more important, a new interface ID. Then I updated the server class declaration simply by writing:
type
  TDllNumber = class (TComObject, INumberProp)
  ...
Also this class has a new server object ID. The client program, saved in the TestProp directory, can now simply use the Value property instead of the SetValue and GetValue methods. Here is a small excerpt from the FormCreate method:
Num1 := CreateComObject (CLSID_TDllNumberProp)
  as INumberProp;
Num1.Value := SpinEdit1.Value;
Label1.Caption := 'Num1: ' + IntToStr (Num1.Value);
The difference between using methods and properties for an interface is only syntactical, since interface properties cannot access private data, as class properties can. By using properties the code can be a little more readable.
Note: You can also define array properties, and even choose an array property as default array property for the interface, but these are advanced topics that we won't explore.
Using a Shell Interface
In the last section we built a fully standard COM object, packaged it as an in-process server, and used it from a standard client. However, the COM interface we implemented was a custom interface we'd built. Now we can try to build clients and servers related to the Windows 95 shell interfaces, which are all COM.
Note: I'm going to build two simple examples, because in-depth coverage of the Windows 95 shell will require at least a couple of chapters (there are entire books devoted to this subject). Among other books, you'll find a more detailed description of using Windows 95 shell interfaces in the Delphi Developer's Handbook.
Creating a Shell Link (or Shortcut)
One of the simplest shell interfaces we can use in a client application is the IShellLink interface. This interface relates to Windows 95 shortcuts and allows programmers to access the information of an existing shortcut or to create a new one.
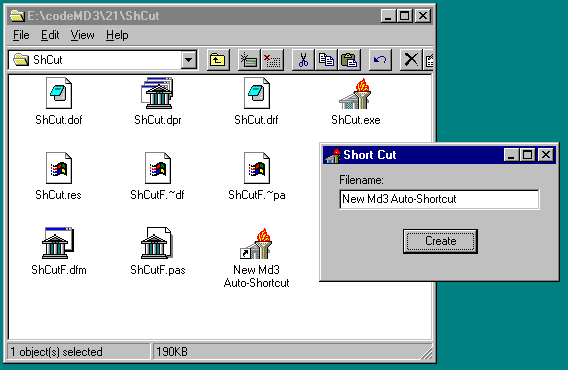
In the ShCut example, I'm going to create a new shortcut to the program itself. Of course, once you understand how to do this, you can easily extend the example. The example has an edit box and a button. When the button is pressed, the text of the edit is used as name of a new shortcut:
uses
  ComObj, ActiveX, ShlObj;

procedure TForm1.Button1Click(Sender: TObject);
var
  AnObj: IUnknown;
  ShLink: IShellLink;
  PFile: IPersistFile;
  FileName: string;
  WFileName: WideString;
begin
  // access to the two interfaces of the object
  AnObj := CreateComObject (CLSID_ShellLink);
  ShLink := AnObj as IShellLink;
  PFile := AnObj as IPersistFile;
  // get the name of the application file
  FileName := ParamStr (0);
  // set the link properties
  ShLink.SetPath (PChar (FileName));
  ShLink.SetWorkingDirectory (PChar (
    ExtractFilePath (FileName)));
  // save the file, using a WideString!
  WFileName := ExtractFilePath (FileName) +
    Edit1.Text + '.lnk';
  PFile.Save (PWChar (WFileName), False);
end;
The most important code is at the very beginning of this method. The CreateComObject call creates a system object, as indicated by the GUID passed as parameter. The result of this call (which is an IUnknown interface) is converted both to an IShellLink interface and to an IPersistFile interface. Actually, we could have written the code using this shortcut form:
ShLink := CreateComObject (CLSID_ShellLink) as IShellLink;
PFile := ShLink as IPersistFile;
If you look at similar examples built in Delphi 2 or in other languages, you'll notice that to access the IPersistFile interface the programs use custom calls to the QueryInterface method. The two as expressions basically call QueryInterface for us.
Once we have two interfaces relating to a single server object, we can call some of their methods, such as SetPath and SetDirectory, and then Save. This last call (which creates the physical .LNK file) requires a "pointer to wide char" parameter. The simplest way to obtain this in Delphi 3 is to declare a wide string and then cast it to a PWChar.
Note: Do not try casting a plain string to PWChar --the compiler will not complain but the program won't work!
The effect of running this program and pressing the button is that in the directory of the project, Windows 95 will add a new link. You can see an example of the program in Figure 21.5.
Figure 21.5: The simple user interface of the ShCut example, and some shortcuts created with it in the project folder.
A Copy Hook for Pascal Files
As a second example of integrating a program with the shell, we can now write a simple server. Again, I've decided to implement a very simple example, a copy hook, which is a server that implements the ICopyHook interface and registers it into the system. A copy hook server registered into the system is triggered whenever you copy, move, or delete a folder, a directory (but not when you do one of these operations on a file). The name of the example is PasCHook.
To start building a new server we can simply select the File New command of Delphi, and in the ActiveX page choose ActiveX Library. This generates the code for an empty COM server, which corresponds to the project source code we've already used:
library Project1;

uses
  ComServ,
  Unit1 in 'Unit1.pas';

exports
  DllGetClassObject,
  DllCanUnloadNow,
  DllRegisterServer,
  DllUnregisterServer;

{$R *.RES}

end.
Now we can simply get rid of the resource inclusion directive and start writing the code of the secondary unit. In the new unit we should create and register a new class, with a custom GUID:
uses
  ShellObj;

const
  CLSID_PascalCopyHook: TGUID =
    '{80A06FA0-7DF2-11D0-98D0-444553540000}';

type
  TPasCopyHook = class(TComObject, ICopyHook)
  public
    function CopyCallback (Hwnd: THandle; wFunc, wFlags: UINT;
      pszSrcFile: PAnsiChar; dwSrcAttribs: DWORD; pszDestFile:
      PAnsiChar; dwDestAttribs: DWORD): UINT; stdcall;
  end;
The ICopyHook interface we want to implement has just one method and is defined as follows:
type
  ICopyHookA = interface(IUnknown)
    function CopyCallback(Wnd: HWND; wFunc, wFlags: UINT;
      pszSrcFile: PAnsiChar; dwSrcAttribs: DWORD; pszDestFile:
      PAnsiChar; dwDestAttribs: DWORD): UINT; stdcall;
  end;
  ICopyHook = ICopyHookA;
This interface is an exception to the other shell interfaces, because it directly uses the name of the source and destination folders. Other shell extension servers, instead, receive a block of memory with file information, using a specific interface. If you try implementing them, be warned that they require much more code than this copy hook example.
Here is the code of my implementation of the copy hook CopyCallback method, which should return id_Yes to allow the specific folder operation, id_No to indicate that the specific folder operation should not be completed, and id_Cancel to abort the remaining operations if we are working with multiple folders. In this case, in fact, the method is called once for each folder. Here is the code, based on a case statement which produces a slightly different output depending on the type of operation:
function TPasCopyHook.CopyCallback (Hwnd: THandle;
  wFunc, wFlags: UINT; pszSrcFile: PAnsiChar;
  dwSrcAttribs: DWORD; pszDestFile: PAnsiChar;
  dwDestAttribs: DWORD): UINT; stdcall;
var
  Msg: string;
  MessType: TMsgDlgType;
begin
  Application.Handle := Hwnd;
  Msg := '';
  MessType := mtConfirmation;
  case wFunc of
   FO_COPY: Msg := Format (
     'Are you sure you want to copy the %s ' +
     'folder to the %s destination?',
[pszSrcFile, pszDestFile]);
   FO_DELETE:
   begin
     Format ('Caution... the folder %s is ' +
       'about to be deleted, unless you say no.', [pszSrcFile]);
     MessType := mtWarning;
   end;
   FO_MOVE: Format (
     'Are you sure you want to move the %s ' +
     'folder to the %s destination', [pszSrcFile, pszDestFile]);
   FO_RENAME: Format (
     'Are you sure you want to rename the %s ' +
     'folder as %s', [pszSrcFile, pszDestFile]);
  end;
  if Msg <> '' then
    // ask for confirmation
    Result := MessageDlg (Msg, MessType, mbYesNoCancel, 0)
  else
    Result := id_Yes;
end;

initialization
  TComObjectFactory.Create(ComServer, TPasCopyHook,
    CLSID_PascalCopyHook, 'PasalCopyHook',
    'CopyHook Demo from Mastering Delphi 3', ciMultiInstance);
end.
Notice the statement at the beginning, Application.Handle := Hwnd, which allows us to use the MessageDlg function properly. In fact, the CopyCallBack method received as parameter the handle of the window to use as owner window for our dialog boxes. If you use the MessageBox Windows API, you simply pass that handle as first parameter; if you use a VCL function you should use this parameter to set the Handle property of the Application object.
Once you have written and compiled this program, you are ready for the most complex step, registering the application. This time you need to write a specific .REG file to hook the server DLL into the shell. Basically, you can register a shell extension for a specific file or for any file. A shell extension for folders is indicated in the Registry with the Directory entry. Under this entry you should add a new key for CopyHookHandlers and give it the value of the GUID of our server. Of course, you should also register the CLSID of the server (as accomplished by the first group of statements). Here is the .REG file:
REGEDIT4

[HKEY_CLASSES_ROOT\CLSID\ |
  {80A06FA0-7DF2-11D0-98D0-444553540000}]
@="PascalCopyHook"
[HKEY_CLASSES_ROOT\CLSID\ |
  {80A06FA0-7DF2-11D0-98D0-444553540000}\InprocServer32]
@="e:\\codeMD3\\21\\PasCHook\\PasCHook.dll"
"ThreadingModel"="Apartment"

[HKEY_CLASSES_ROOT\Directory\shellex\CopyHookHandlers]
@="PCopyHook"
[HKEY_CLASSES_ROOT\Directory\shellex\CopyHookHandlers\PCopyHook]
@="{80A06FA0-7DF2-11D0-98D0-444553540000}"
Notice that to fit the printed page I had to split a couple of long lines (marked with the | symbol and indented in the listing above), but you cannot do that in the actual .REG file. Registration files require single long lines of text for an entry within square brackets, and single lines for the various commands.
Note: Besides writing long lines, you should also update the listing above by using the name of the directory where you've placed the DLL. I've left my own directory name in there so you can see the use of double backslashes to indicate the path of the server.
As an alternative to using a .REG file, you can also update the Windows Registry using the specific API. Delphi actually provides a specific class for this, TRegistry. You'll learn how to use this class in Chapter 25.
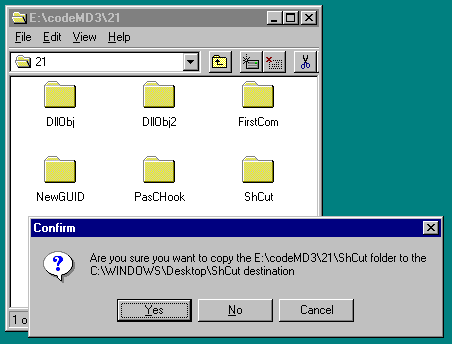
Once this program is properly compiled, you can merge its registration file into the Windows Registry. Simply executing the REG file usually does the trick, although in this case you should also reboot the system (sometimes you can skip this step). Now every time you do one of the folder operations indicated above ( move, delete, copy, or rename) you'll be asked to confirm the operation. You can see an example of the output in Figure 21.6.
Figure 21.6: The output of the PasCHook example, when you are trying to move a folder.
It probably makes more sense to ask for confirmation only for delete operations, and only if the folder contains specific files: now that you understand how to make a shell copy hook in-process server, you can extend it any way you like. When you want to remove the copy hook handler, you can simply remove it from the list of keys under the Directory\shellex\CopyHookHandlers of the HKEY_CLASSES_ROOT section of the Windows Registry. Installing another copy hook handler, in fact, adds it to the list, and doesn't replace the current one.
What's Next
In this chapter we've focused on the foundations of OLE and COM. We've seen how to place objects in a DLL, how to turn them into COM objects, and how to implement a server that interacts with the Windows 95 shell.
In the coming chapters we'll focus on other kinds of servers supported directly by Delphi 3: automation servers, Active Documents (or OLE Documents), ActiveX, and ActiveForm. We'll cover these features without going into detail, because covering each of these interfaces, and their many related topics, is beyond the scope of this book. For example, we'll learn to write OLE Automation servers and ActiveX controls in Delphi 3, without studying how Delphi makes them work.
This text has been updated in the revised editions of the book, the last is Mastering Delphi 5.